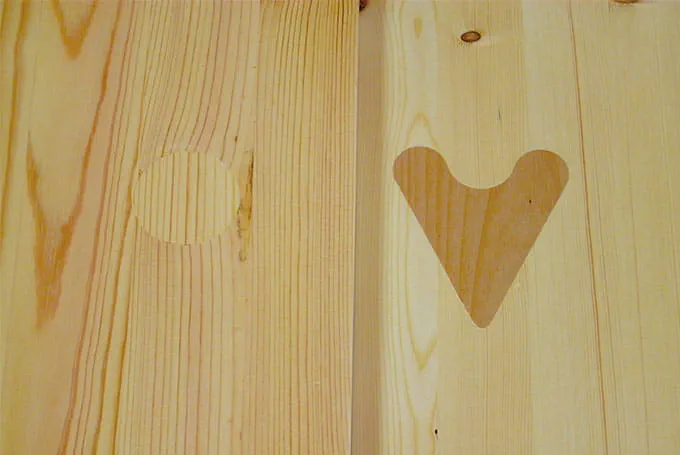
Wood hole repair and patching knots with the router

Description
Using a router, groove cutter and two copying rings, users can perform a variety of inlay and patching work, such as repairing different types of holes in wood. This concept is based on the use of copying rings of different sizes; the large ring is used for routing the recess and the small ring for routing the inlay. This means that both copying rings have to be set to a certain groove cutter diameter so that the recess and inlay fit exactly into one another. This technique is particularly useful when sealing large knotholes or patching up angled knots with the same kind of wood. The shape and size of the wooden inlay can be selected as required. This technology also ensures rapid and, above all, absolutely precise results for many types of inlay work.
The following material is required:
Sample or template for routing with copying ring
Tools/accessories
Alternative tools
Preparation/set-up
-
Carry out the following preparatory work in order to repair large holes in wood:
First, use a 9–10 mm thick piece of plywood or Multiplex to produce a template for the copying rings to subsequently follow.
A template with multiple large holes is particularly useful; these holes can be drilled into the wood using a hole saw for the drill. Depending on the size of the knothole, users then select a corresponding bore to patch the knothole.
The 40 mm copying ring is then secured using two screws and the centring mandrel below the router.
The groove cutter with a diameter of 8 mm is then clamped.
Procedure
-
Place the template on the workpiece and align the holes to be used for the repair exactly in the middle of the knot. Now clamp it onto the workpiece and the worktop using two fastening clamps. Ensure that the router does not bump against the fastening clamps during repairs.

-
Connect the tool to a dust extractor and move the machine down until the cutter touches the workpiece surface. Use the turret stop and scale to set the routing depth to approx. 6–8 mm. Move the router back up into initial position. Now switch it on and then insert the cutter into the workpiece. Working in the clockwise direction, rout a circular recess out of the workpiece. The router is guided exactly in the template opening by the copying ring.

-
Now look for a board with a colour and grain pattern that approximately matches the section you have just cut out. Use a pencil to mark the matching point on the board and clamp the template with the same bore exactly in this position with fastening clamps.

-
Now exchange the size 40 copying ring for a ring with a diameter of 24 mm. The centring mandrel must be used to precisely centre the copying ring. Then clamp the 8 mm groove cutter in the router again. Set the routing depth at the turret stop to approx. 12–15 mm. Place the router on the template and move the copying ring to the bore. Now switch on the router and plunge the cutter into the workpiece. Move the router clockwise with light pressure against the template until a circular inlay block has been cut. The router must be moved clockwise to ensure that it moves towards the template and is not forced away from it.

-
The inlay block should not be cut out of the board completely so that it does not move into the cutter and become unusable. The remainder is therefore cut out coarsely with a jigsaw.

-
This block is then glued into the recess with white glue and secured with a clamp for approx. 60 minutes.

-
The protruding section is then carefully removed with a firmer chisel or hand planer.

-
Precision repair work is best left to the eccentric sander. It provides the final touch to the hole repairs and ensures that the wooden surface is as even as possible.

-
If certain shapes have to be inlaid in the wooden surface, or irregularly-shaped holes are present in the wood, this is also possible with this technology. Simply transfer the shape to a template and cut out with hole cutter and jigsaw. Then remove all surface irregularities with a wood file; otherwise these irregularities will be transferred to the workpiece when the copying ring follows the template. The inlay is then routed out with the smaller ring, but the same cutter. Different types of wood and colours can create charming contrasts here.

-
Our illustrated guides and work results are documented working steps that we have performed in practice. They are individual examples and do not guarantee or promise that users will obtain the same results. The results will depend on the user's experience and skill, as well as the material being used. Illustrated guides do not replace any Festool operating manuals and/or safety instructions. Liability for ensuring that the information, instructions and applications are free from content defects and defects of title, in particular with regard to the absence of defects, correctness, freedom from third party intellectual property rights and copyrights, completeness and fitness for purpose, is excluded. Claims for damages made by the user, regardless of their legal basis, are excluded. These liability exclusions are not applicable if the damage was intentional or caused by gross negligence, or in cases of statutory liability.
We cannot accept liability for damage resulting from defects.↑


